5. Basic Concepts
5.1. Events
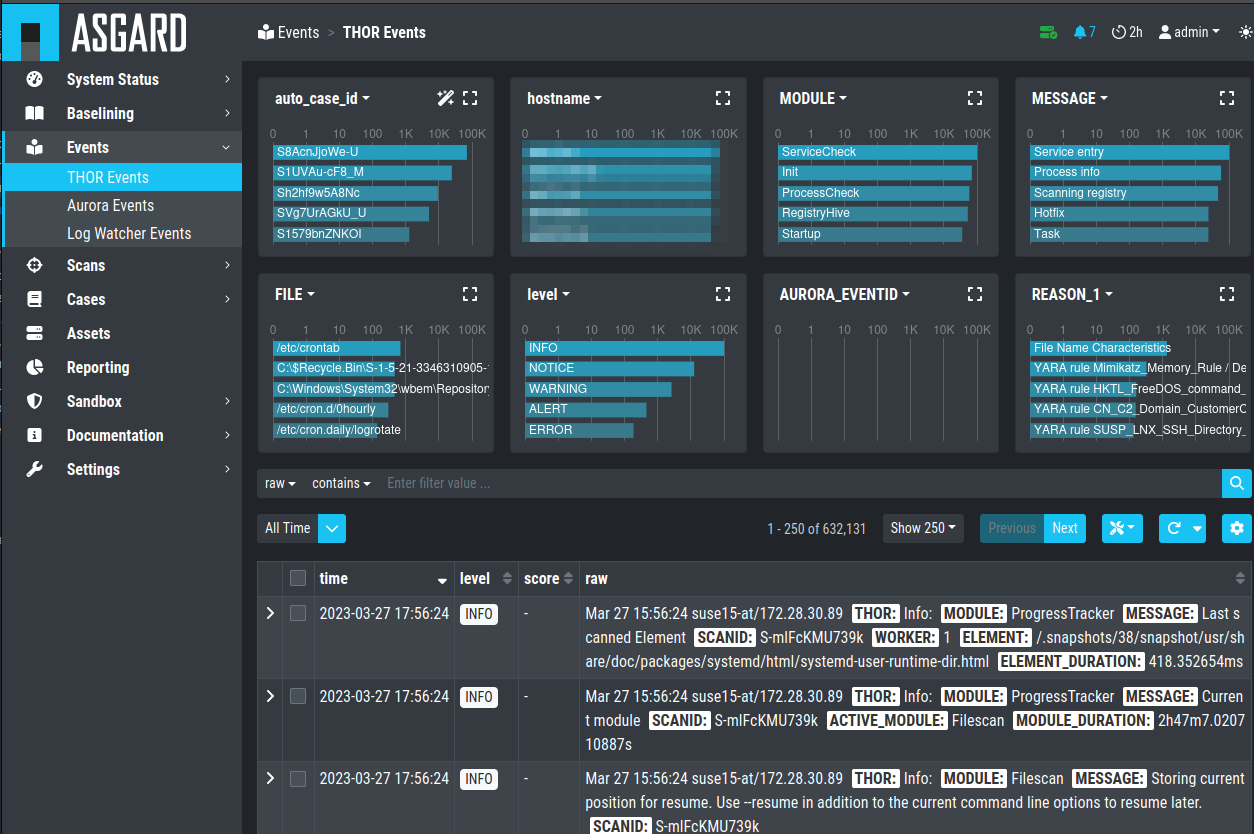
All events that have been stored in your Analysis Cockpit – regardless
if they are assigned to a particular case or not – are displayed
in the section Events. This section can be seen as your threat hunting
pool. The section provides powerful filtering options. The Events
Section is split into the different sources of your Events:
THOR Events
Aurora Events
Log Watcher Events (deprecated)
Events Section
5.2. Baselining
All events that have not been assigned to a particular case are
displayed in the Baselining section of the Analysis Cockpit.
Again, the Baselining Section is split into the different sources
of our events. Additionally, you can see the Suggested Cases, which
will suggest cases based on predefined Case Templates.
THOR Events
Aurora Events
Log Watcher Events (deprecated)
Suggested Cases

Baselining Section
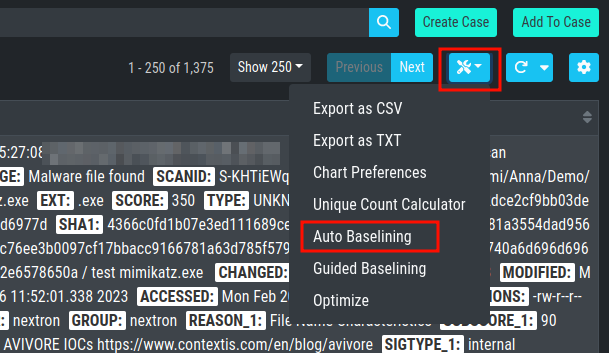
Logs that represent the same type of anomaly or incident can be grouped
together using the various filters and then be stored in a Case for
further analysis. Grouping can be done manually by filtering and clicking
Create Case, selecting individual Events and clicking Create Case,
or automatically by simply clicking the Advanced Tools button and
Auto Baselining. With Auto Baselining, the Cockpit automatically calculates groups of
"similar" log lines.
Once stored in a case, the logs will disappear from the Baselining section.
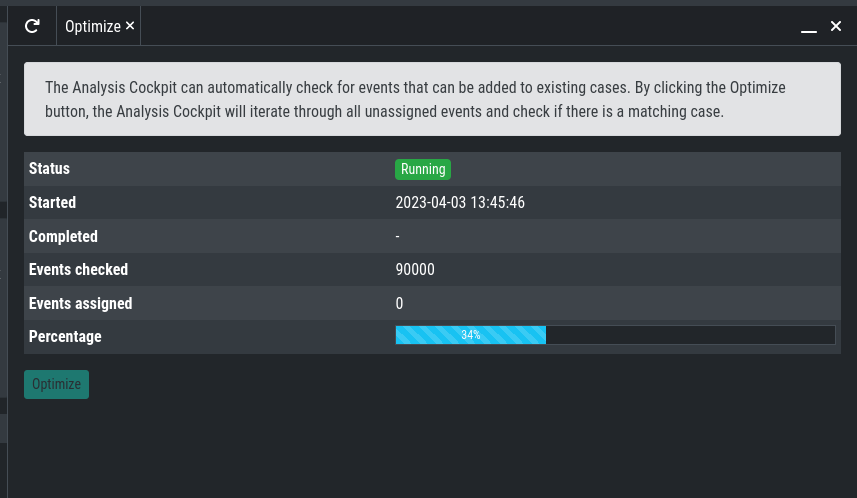
Auto Baselining
The Analysis Cockpit can automatically check for events that can be added to
existing cases. By clicking the Optimize button, the Analysis Cockpit will
iterate through all unassigned events and check if there is a matching case.
Optimize Function
Note
The optimization will iterate through all unassigned events and assign them to cases if a match were found. This may take a while.
In an ideal organization, the Baselining section should always be empty at the end of a day, as these logs represent suspicious elements that have not yet been looked at.
5.2.1. Baselining Views
In the Baselining section there are two main views, the Compromise Assessment Mode
and the Deep Inspection Mode. Additionally, you can find the Custom Signatures
Only Mode, which will only show events found by custom signatures. This can
be helpful if you scanned your environment with customer signatures, for example
during or after an incident.
By default, the Analysis Cockpit Baselining Mode is set to Compromise Assessment.
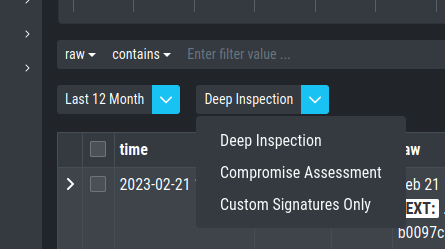
Select your view
5.2.2. Compromise Assessment Mode
The Compromise Assessment Mode is a new filter/representation of events
created and reviewed by our security experts.
It includes our most successful detections. In this context "success" means, that the detection uncovered malicious activity in the wild and at the same time had a low anomaly and false positive rate. Additionally we also consider a detection to be successful that caused little or no false positives or anomalies.
The new view will combine and apply different techniques and filters to all
the unclassified events in the Baselining section, providing a reduced
set of logs which proved to be relevant from an analyst perspective.
This new "Compromise Assessment Mode" dramatically reduces your baselining effort. In our tests we noticed a decrease of events in the Baselining section of more than 90%. We believe that especially entities that follow our "Continuous Compromise Assessment" approach should switch into this new mode. We've also challenged the new mode with the post exploitation tools and techniques found in the context of HAFNIUM / Exchange exploitations in March 2021 and covered almost every aspect of the attacks in the new view.
Note
In case of an Incident Response, the Deep Inspection Mode is always
recommended, since nothing is filtered here.
5.2.3. Deep Inspection Mode
This view is basically how it used to be (the old default view). It shows all Alerts and Warnings unless they are already part of an existing case.
5.2.4. Custom Signatures Only Mode
The Custom Signatures Only view will only show you events, which:
Are not part of a case
Where found by a custom signature
This view can be helpful if you only want to see events found by one of your custom signatures during a THOR scan. This can be helpful if you want to see only those events and nothing else.
5.3. Cases and Log Processing
The Cases section gives a good overview regarding the existing cases and also provides various filtering options. Column visibility can be configured by clicking on the Columns button of this section.
The Cases Section is split into the different sources of your Cases:
THOR Cases
Aurora Cases
Log Watcher Cases (deprecated)
Additionally, you can find more information regarding:
Grouping Criteria
Case Changes
Security Center
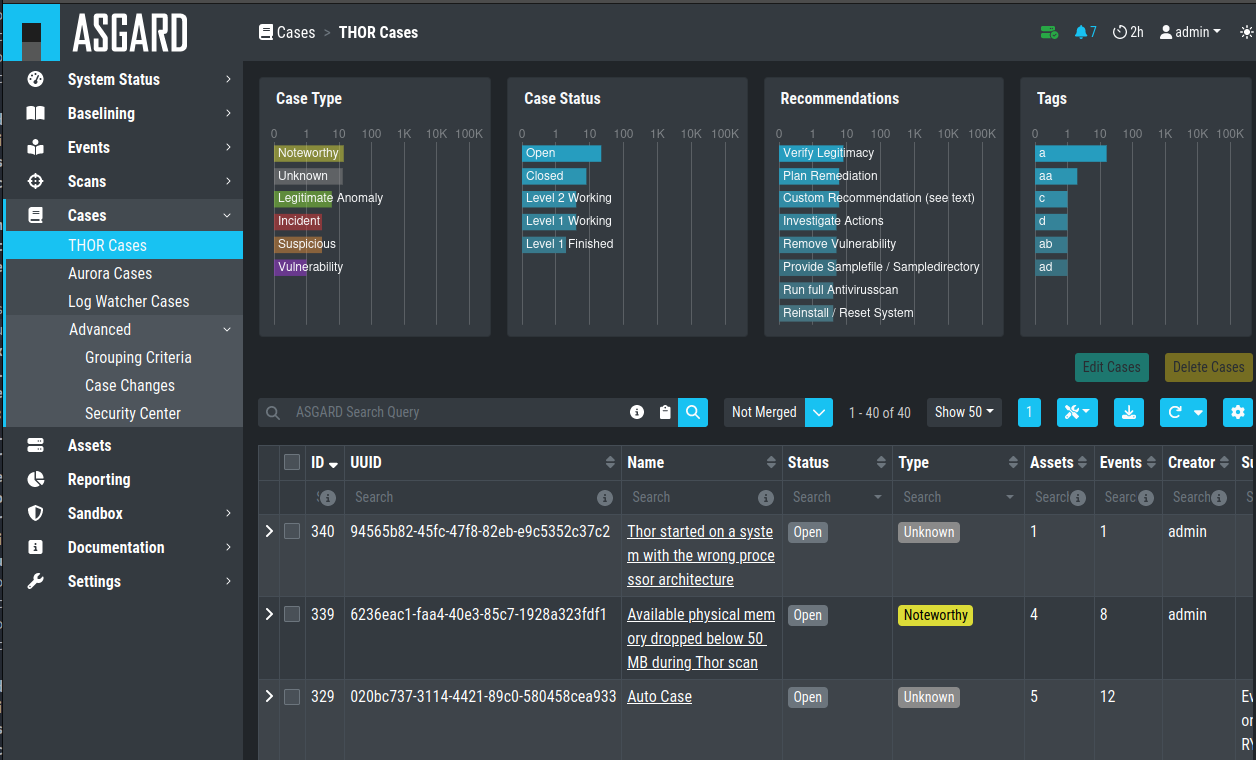
Cases Section
When a case is created, the state will be "Open" and the type will be set to "Noteworthy" by default.
The following states can be set (by default):
Open
Level 1 Finished
Level 1 Working
Level 2 Working
Closed
It is possible to configure custom states.
The following types can be set:
Incident
Suspicious
Vulnerability
Noteworthy
Unknown
Legitimate Anomaly
False Positive
See chapter Glossary for a detailed description of these terms.
Within a case, it is possible to add various information, write a summary, provide canned recommendations or add assessment information.
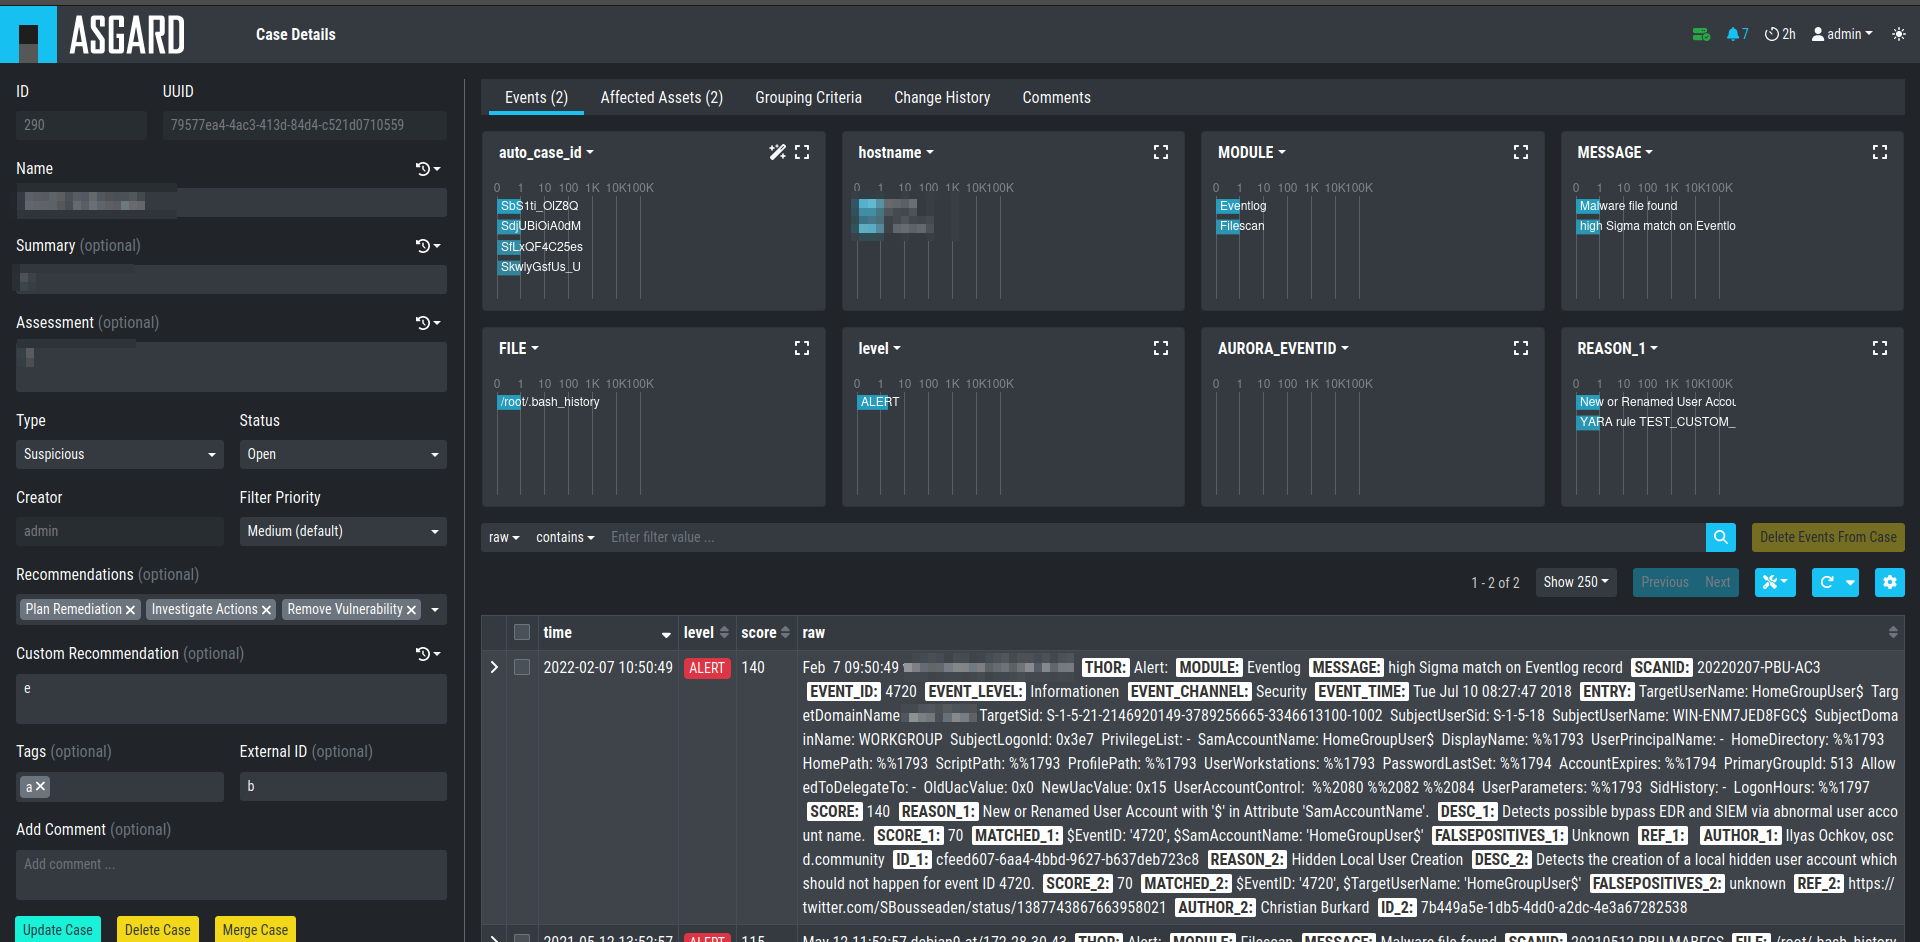
Case Details
The log lines contained in the case can of course be analyzed in detail and changes to the case are tracked automatically.
The cockpit will automatically calculate rules (auto_case_id), that
make sure, future incoming logs that are similar to the log lines in
this particular case are automatically assigned to this case and will
not show up in the Baselining section.
Important
Automatically assign newly incoming events to this case needs to
be selected during case creation to automatically assign new events
to an existing case.
In order to understand this better, let's assume you have decided a group of logs are legitimate anomalies. Then all future logs that are similar to these anomalies will automatically be added to this case and not show up in the Baselining section.
In case you have decided a group of log lines represent a security incident, the same thing will happen. Future log lines that represent a security incident will show up only in the case and not in the Baselining section.
Most organizations want to be alerted in case of a security incident. The Cockpit can be configured to forward all logs that are automatically assigned to an incident case to the organizations' SIEM System via syslog. Organizations that prefer to handle THOR Events entirely within the Analysis Cockpit and not forward anything to a SIEM system may choose to configure a notification that shows up in the Cockpit's Notification Section.
The following picture shows the recommended log processing.
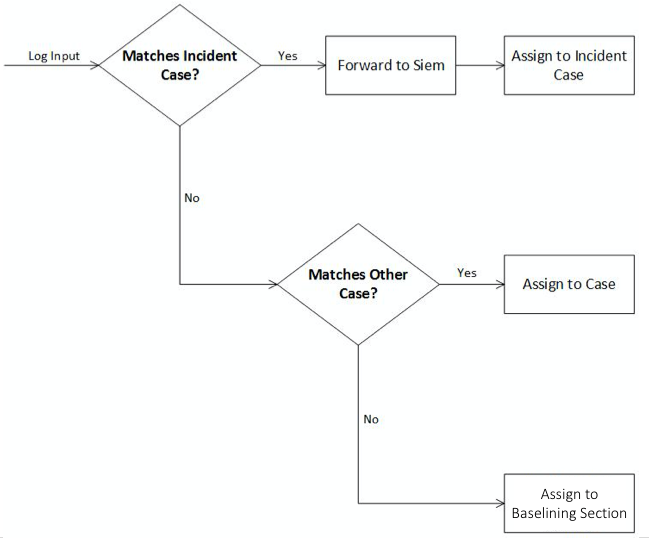
Log Processing
As one can see, an incoming log line only shows up in the Baselining
section when it matches no existing case.
This behavior is highly configurable and can be changed in the
Settings section of the Analysis Cockpit. One can even decide not to
forward anything to a SIEM System or may decide to also forward
suspicious elements in addition.
In other Words:
Cases represent the means of setting and maintaining the log baseline
within the Cockpit. When you scan your infrastructure once, assign all
logs to cases and then scan it for the second time, the Baselining
section should be empty if nothing has changed. All incoming logs should
be similar to the ones in the first scan and therefore be assigned to
the respective cases and not show up in the Baselining section.
Working with cases is explained in detail in the sections below.
5.3.1. Case Templates
Case Templates can be used to suggest new cases in the Suggested Cases
section. If there are no Suggested Cases in the view, no events match
the Case Templates in your Analysis Cockpit.
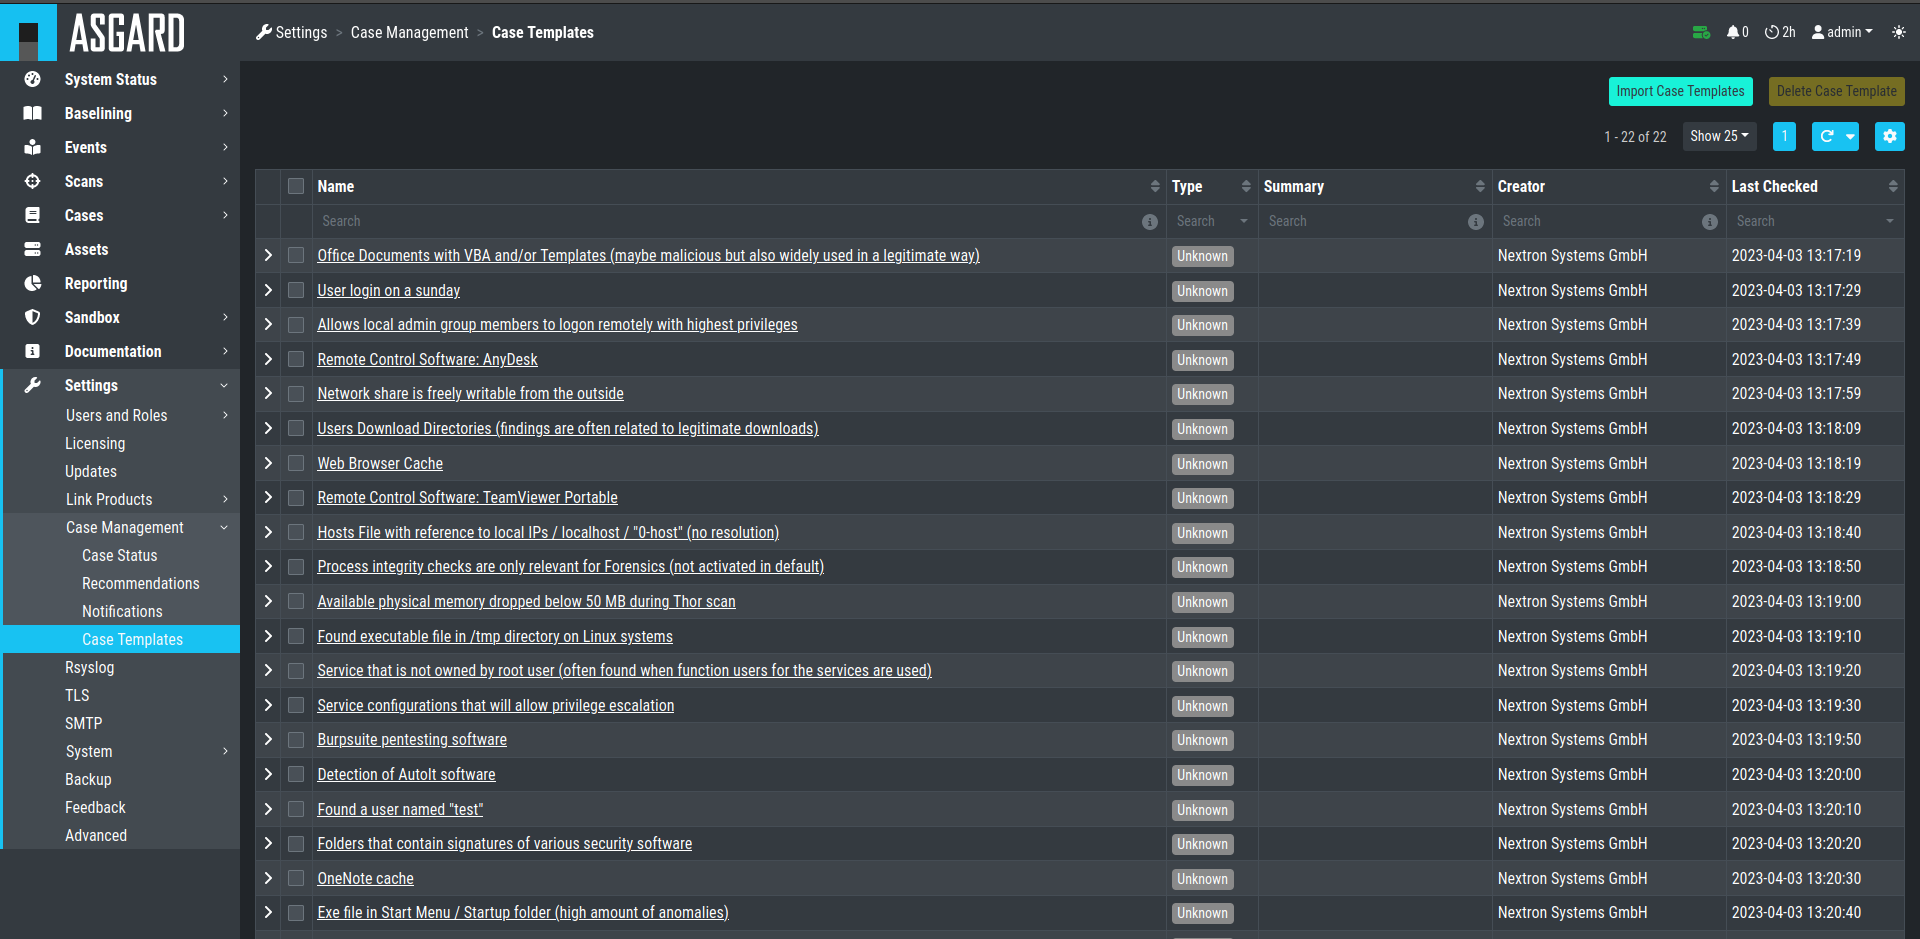
Case Templates Overview
To import new Case Templates, you need to create a .yaml file with
the conditions first. This can be done by navigating to the Cases
view and exporting your search results as Case Templates. You will
be able to download a .yaml file from here, which can be used to
import as a Case Template.
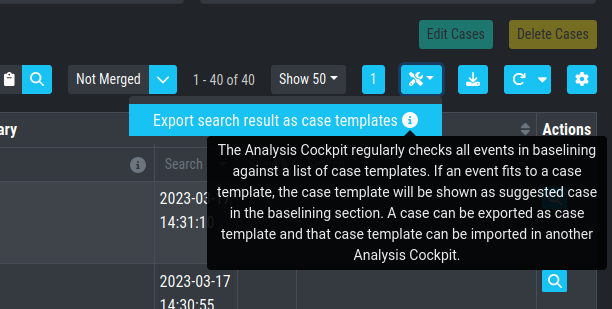
Exporting Search Results as Case Templates
1uuid: 94565b82-45fc-47f8-82eb-e9c5352c37c2
2name: Thor started on a system with the wrong processor architecture
3summary: ""
4type: 5
5scanner: THOR
6creator: admin
7condition: "\"MODULE: Startup\" AND \"MESSAGE: 32 bit THOR was executed on 64 bit
8  system. For improved results, use the 64 bit version of THOR.\"\r\n"
After you downloaded the Case Templates, you can import them in the Case
Templates view.
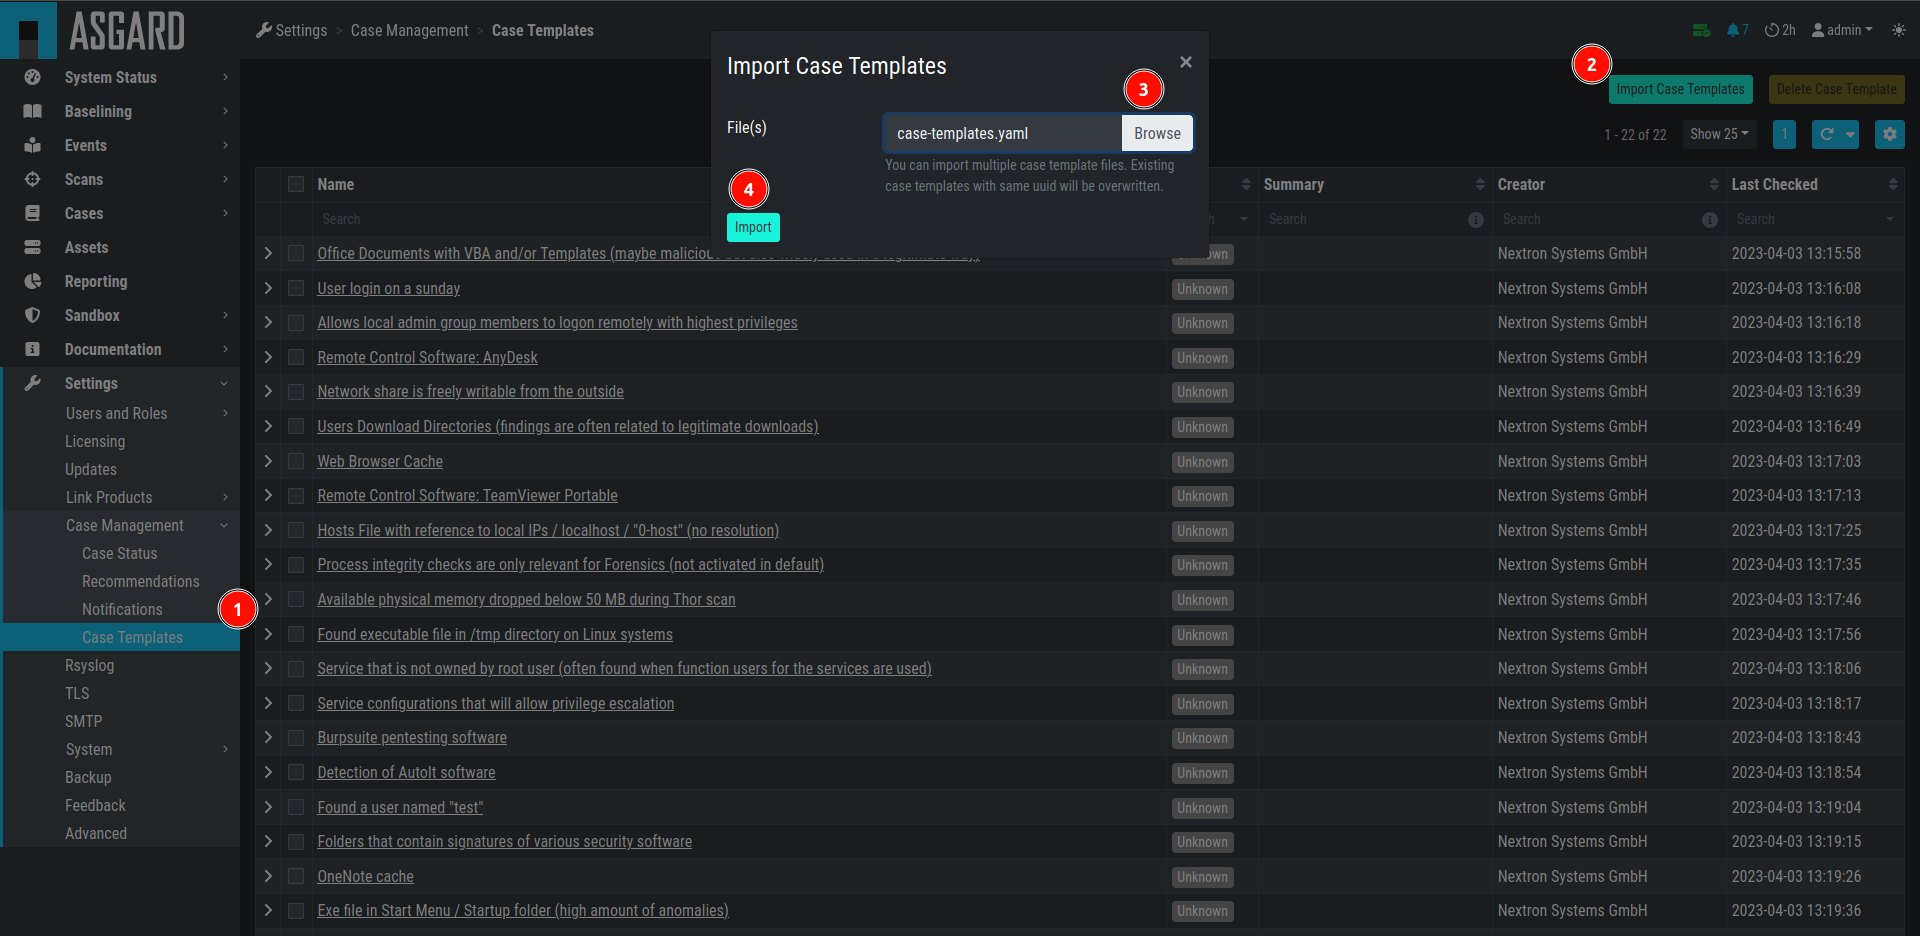
Import Case Template
You can now inspect the Case Template. You can find it by either looking
for the name or filter by who created it. You can see that the conditions
match the contents of your exported Case Template (.yaml file).
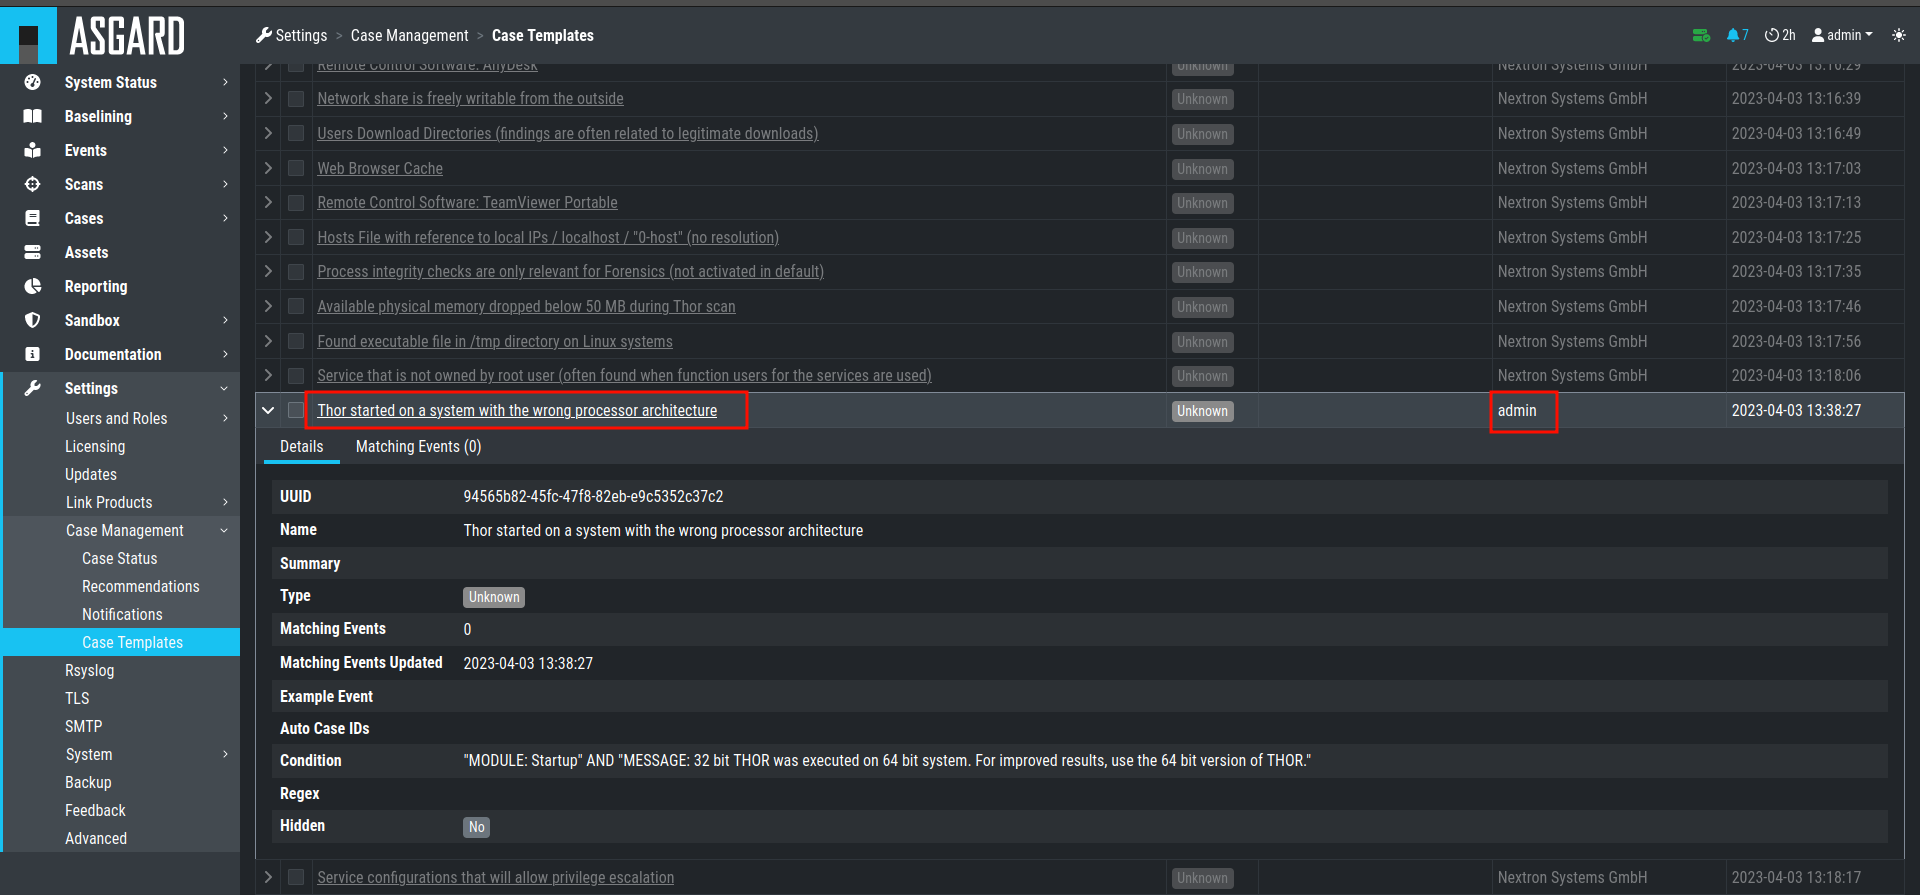
Inspect Imported Case Template
5.4. Understanding Users, Roles, Rights and Case Status
The rights and roles model within the cockpit is aimed to support large multinational organizations with different independent users working with the case management at the same time. An organization responsible for analyzing THOR logs might be split up in groups of analysts.
Within the cockpit, all users have the right to access the logs and
create cases. Within the Case Management section, access rights are
granted depending on the particular state the case is in.
In order to setup your rights management you must first decide about the states you want your cases to have, then assign rights for a particular state to a role and after that you add users to that particular role.
In order to understand this better, let's look at an example.
Let's assume we have an organization where a Level 1 analyst group located in Frankfurt is responsible for creating cases and providing an initial assessment for cases, while a Level 2 analyst group located in Hamburg is responsible for reviewing, final decision and closing of cases. In order to support an efficient workflow, you would at least need the following states for your cases:
Open (nobody is yet working on this case)
Level 1 Working (Level 1 is working on this case)
Level 1 Finished (Level 1 has finished and nobody is now working on this case)
Level 2 Working (Level 2 is working on this case)
Closed (Case closed)
A workflow could look like this:
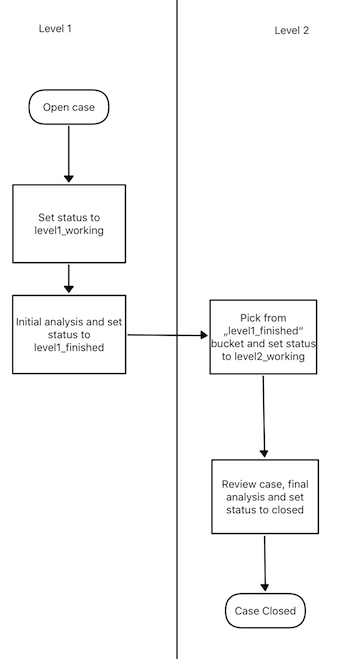
Workflow open Cases
For your convenience, we already did the setup for this example and ship all Analysis Cockpit with this workable template by default. You are free to use, modify or delete the corresponding rights, statuses and roles.
However, in order to explain the concepts and the setup of roles and statuses better we assume for a while, we had an empty cockpit with no roles and statuses pre-configured.
In order to set up our pre-configured example, we navigate to the
Settings section and create the following roles:
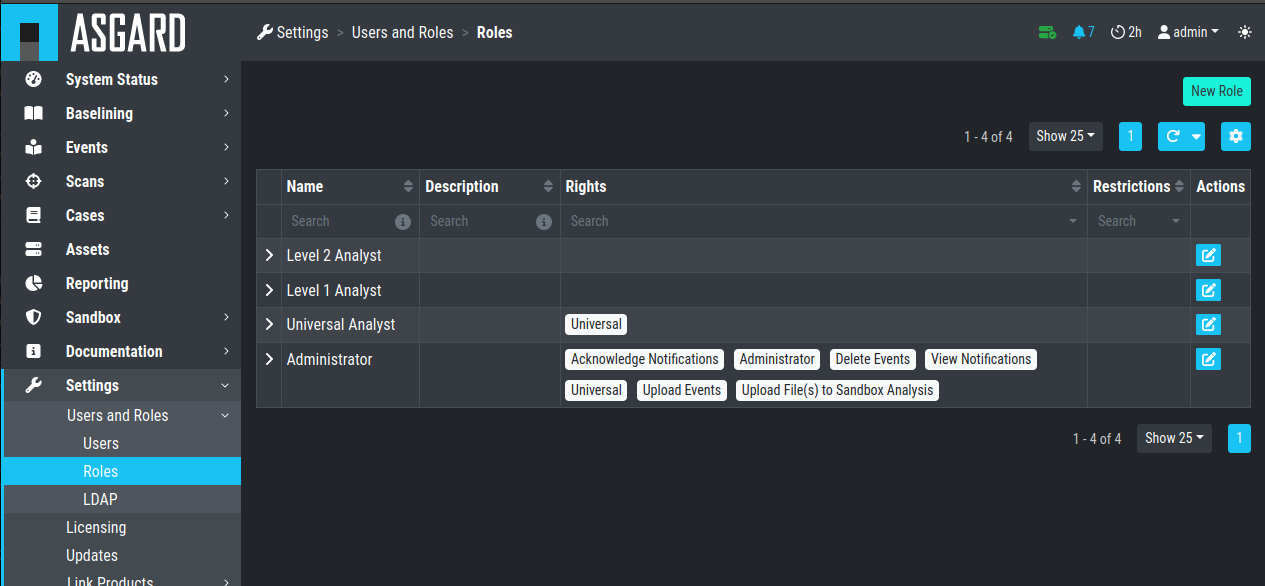
Settings – adding additional roles
Every role can have different rights. We will explain this in detail in the next section. Firstly, we create Level 1 Analyst and Level 2 Analyst without rights at all.
After that we define the following statuses:
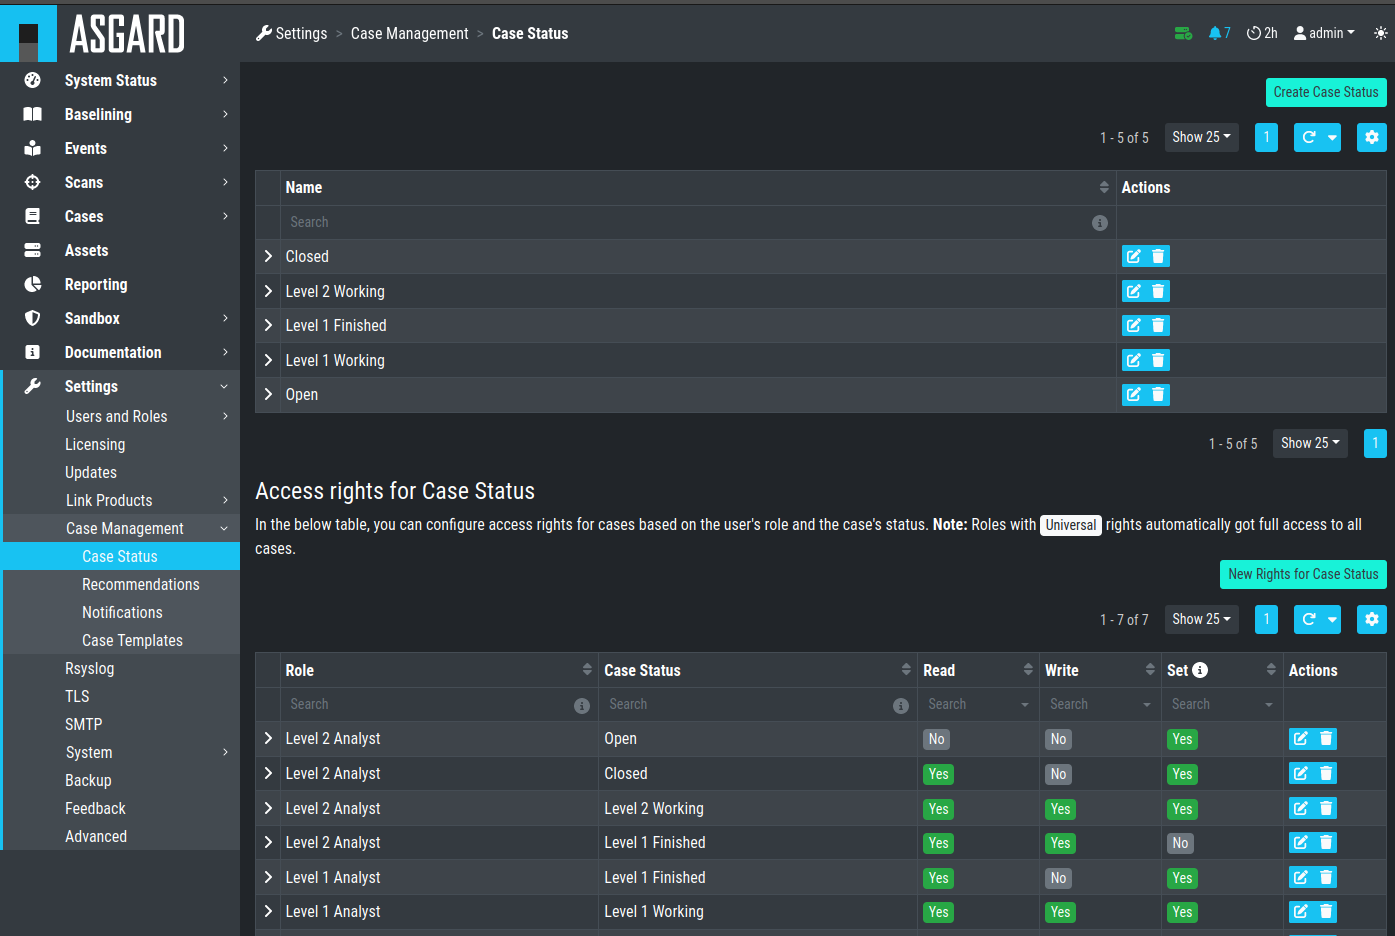
Settings – Case Status
In the lower table you can manage the access rights for every role and
every Case Status. We can give the suitable rights to our generated
roles by clicking the New Rights for Case Status button on the right.

Edit Rights – Read, Write, Set
For Level 1 Analyst we add the right to read and write all "Open" cases and change the case status to this status (set).
Additionally, we grant Level 1 Analyst the rights to read, write and set all cases for "Level 1 Working".
Finally, we grant the right to read and set cases for the status Level1 Finished.
This allows Level 1 Analysts to set a particular case to
"Level 1 Finished" and restricts them from modifying this case once they
have passed it to this status.
For Level 2 we now add the rights to read and write cases for "Level 1 Finished" and the rights to read, write and set cases for "Level 2 Working". This allows Level 2 analysts to pick cases from the "Level 1 Finished" status and start working on them.
As we do not want Level 2 Analysts to reopen cases, that have already been closed we only grant them rights to read and set for the status "Closed".
Additionally, we give Level 2 Analyst the right to set the case status to "Open".
After that, the Access rights for Case Status section looks like this:
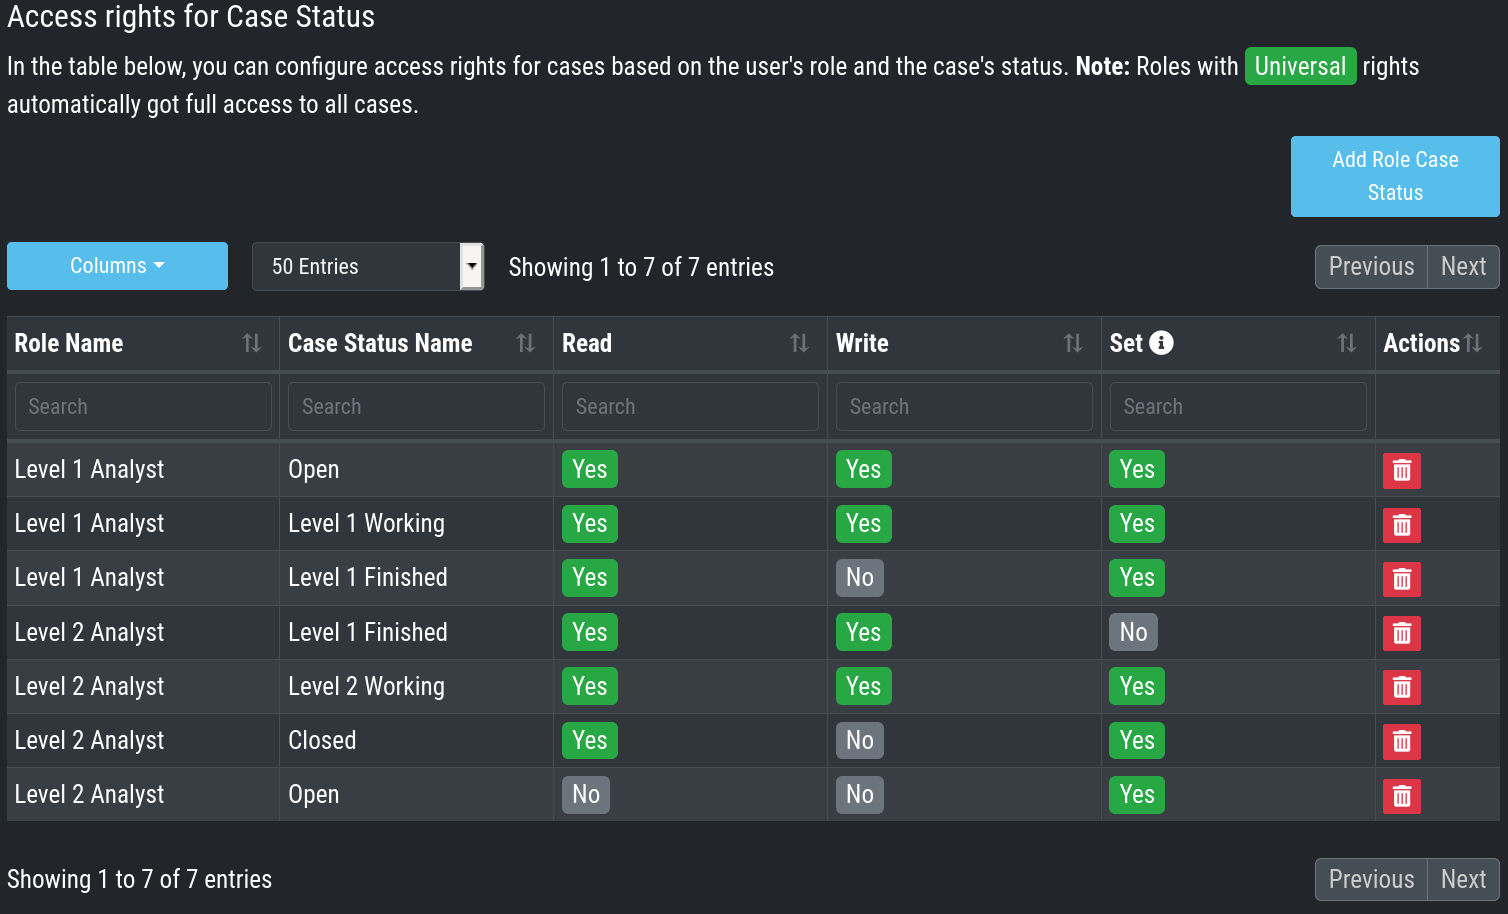
Settings – Access rights for Case Status
Of course, this is only an example. You may of course decide to give Level 2 full access to all cases, and it may also be a good means of training to grant Level 1 Analysts the right to see the "Level 2 Working" and "Closed" cases. You may also want Level 2 Analysts to reopen "Closed" cases or may restrict this right to an additional role. This just illustrates, that the system is highly configurable with an almost infinite number of statuses, roles and rights.
Finally, you simply add users and add them to their particular role.